Despite its use and relevance in the Big Data realm, SQL can be cumbersome to manage from a DevOps perspective, as there are no standardized processes for managing, deploying, or orchestrating a repository of SQL scripts.
Dataform is a tool that enables cross-team collaboration on SQL-based pipelines. By pairing SQL data transformations with configuration-as-code, data engineers can collectively create an end-to-end workflow within a single repository. For a general introduction to Dataform, please see the GA announcement blog post.
The purpose of this article is to demonstrate how to set up a repeatable and scalable ELT pipeline in Google Cloud using Dataform and Cloud Build. The overall architecture discussed here can be scaled across environments and developed collaboratively by teams, ensuring a streamlined and scalable production-ready set up.
Sample workflow
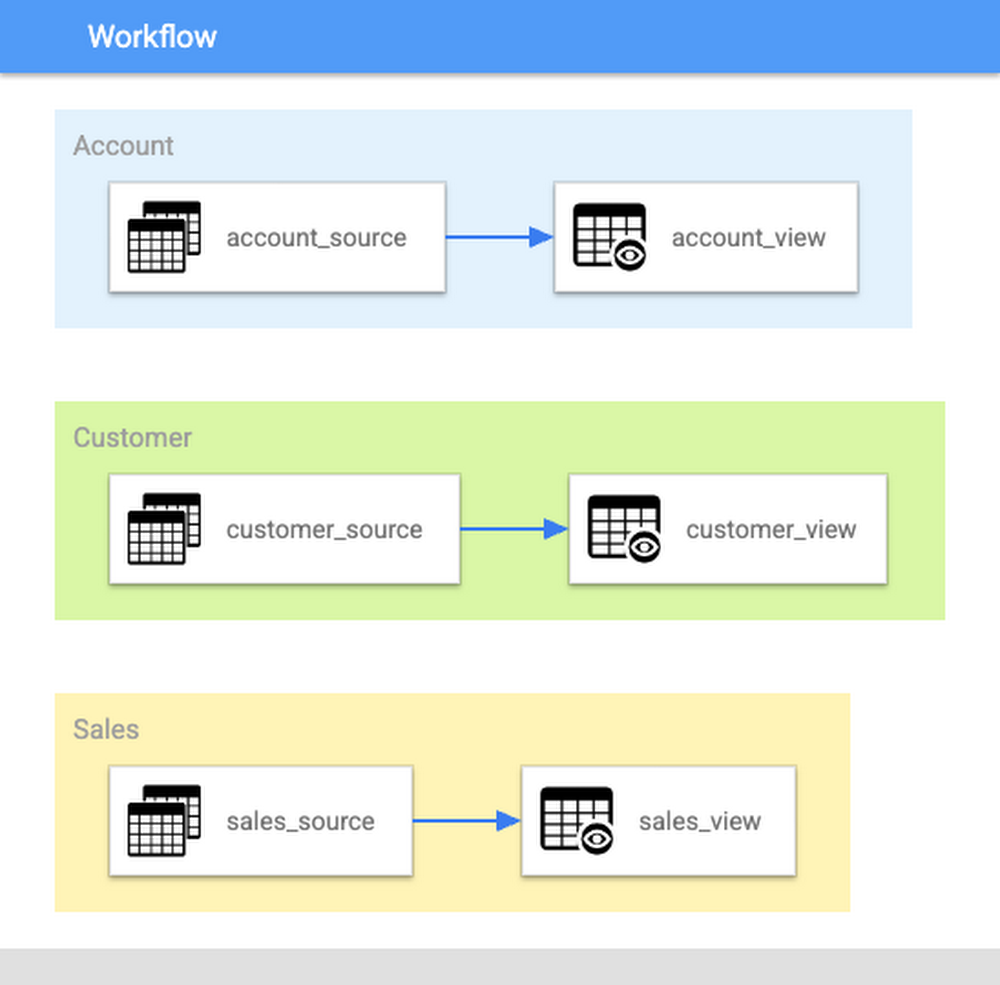
First, let’s consider a simple ELT workflow. In this example, there are three sample subject areas that need to be created as part of a Data Warehouse: Account, Customer, and Sales. The example workflow just consists of building a view based on data in a source table, but this can be expanded as needed into a real world transformation.
To see what the Dataform code would look like for this example, please refer to the accompanying sample code for this blog.
The three subject areas are organized by tags, which separates them into distinct sections of code in the repository. Using the Dataform CLI, you can run commands on your local machine to execute this workflow and build individual subject areas:
dataform run --tags=[SUBJECT_AREA]
When this command is run, Dataform will compile your project into a DAG of SQL actions, run the actions with the tag in question, and create BigQuery jobs to execute the workflow. With tags, a team of developers can build out each subject area or domain in a data warehouse collaboratively.
By using GitHub (or similar version controlled repository) and running local Dataform CLI executions with tags, code changes can be tested in isolation from the rest of the subject areas.
Dataform offers many tools for building out extensive SQL pipelines, which will not be covered in this article. I highly recommend reviewing the Documentation to learn more about how powerful Dataform can be!
Setting up CI/CD for the sample workflow
The previous section highlighted how a team can collaboratively build out and test a Dataform project in GitHub. The question now is, how to easily deploy these code changes and set up a CI/CD pipeline for our Dataform code? This is where Cloud Build comes into play.
You can set up CI/CD in the Dataform project using Cloud Build, a serverless platform that can scale up or down depending on the workload and has tight integration with other GCP services (this will become very useful in the following section).
Going back to the example workflow, you can set up Cloud Build triggers that fetch the latest SQLX files for any given subject area, and execute Dataform to update the data in BigQuery. Let’s explore how this would work for your first subject area (Account).

Preliminary setup: IAM
First, ensure that you have a service account that contains all the necessary roles and permissions needed to build and deploy Dataform code. It is advised to create a custom service account to accomplish this (e.g., “dataform-deployer”) and assign it the following roles:
- BigQuery Admin
- Pub/Sub Publisher
- Logs Writer
1. Version control
To ensure strong version control of all code changes, it is important to store all changes in a git repository. For this example, please refer to the accompanying github repository.
Having a proper repository set up ahead of time will streamline the DataOps process and allow for easy deployment.
2. Build and deploy
To build out this data on your local machine, you just needed to run the Dataform command and pass in the appropriate tag. To move this step into Cloud Build however, you will need to add the following files to your source repository:
- A shell script containing a generalized Dataform command (see run.sh)
- A separate shell script for running unit tests (see run_tests.sh)
- A cloudbuild configuration file for our subject area (see cloudbuild_account.yaml)
Next, you will need to create a Cloud Build trigger following the steps in the public documentation. The first step to accomplish this is to connect the GitHub repository to Cloud Build. You will be asked to authenticate your account and select the repository in question.
Note: the location of the repository is very important. You will only be able to create triggers in the same region that you have connected your repository.
Once the repository is connected, you can create a trigger that will execute the Dataform code. This example will create a manual trigger that you can schedule to run daily, but Cloud Build also supports a variety of other trigger options that might suit your specific use case better.
Follow the on-screen steps to create the trigger, and ensure that the fields accurately reflect how your repository is set up. For the example code, refer to the configurations below:
For the example project to run successfully, you must enter a Project ID and location (US) as substitution variables during trigger creation.
3. Run Dataform CLI and execute BQ jobs
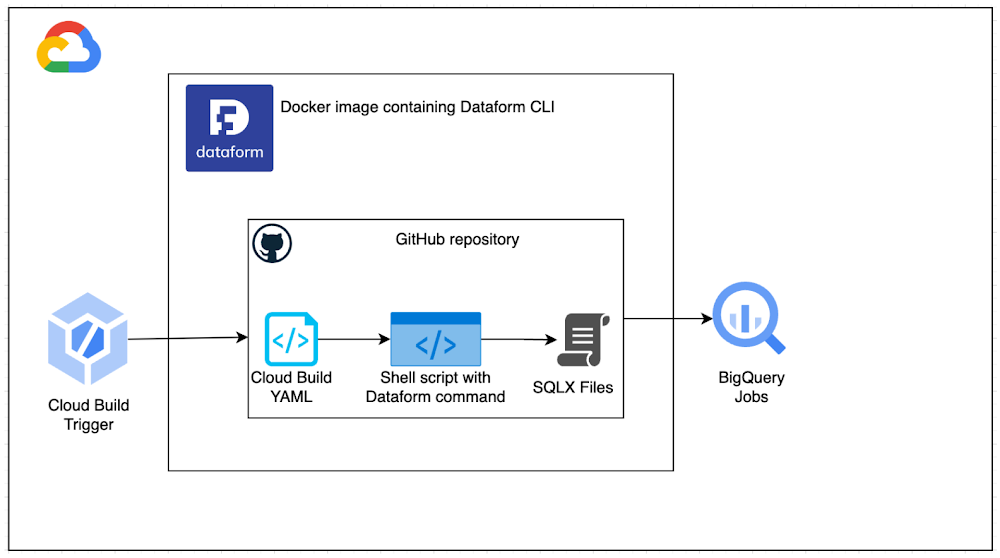
Once the trigger has been set up, you can kick off a manual build and see the pipeline in action. Under the hood, Cloud Build is connecting to your GitHub repository to fetch all the relevant files
- The cloud build YAML file contains the build configuration (i.e., what steps are in the build, what order they execute in, etc.)
- Inside the YAML file are calls to your shell script, which executes a generalized version of the “dataform run” command. Rather than pass in tags and variables manually, we can set these in the cloud build configuration as environment variables
- Everytime the shell script is called, it pulls the relevant SQLX files and executes Dataform
- Dataform in turn interprets the SQLX files you passed in, and spins up BigQuery jobs in response.
Thanks to Cloud Build, you now have CI/CD enabled in your workflow. Every code change that is made in GitHub can be immediately factored into our pipeline execution the next time we trigger a build.
In order to orchestrate this execution to run every day/hour/etc. You just need to create a scheduler job that invokes our manual trigger. This can also be done directly in Cloud Build:

4. Publish success message with Pub/Sub
Lastly, you will need to create a Pub/Sub topic called “dataform-deployments”. The Cloud Build deployment is configured to publish messages to this topic every time a build succeeds (see the final step in the cloudbuild_account.yaml file). This is not going to be very useful in the current section, but you will see its benefit later on.
That’s all there is to it! Now a team of developers can make as many changes to the source code as needed, without worrying about tracking those changes or deploying them.
Linking builds together with Pub/Sub
The previous section explained how to set up one trigger to build one subject area. Let’s also discuss the use case where you have multiple subject areas that need to run one after another. You can revise your Cloud Build configuration file to build each subject area in a separate step, but this comes with one key limitation — if your build fails halfway, you will have to re-run the entire build again (and rebuild subject areas that may have already been successfully updated).
In the working example, you are building Account, then Customer, then Sales in that order. If Account builds successfully but Customer fails mid-way through, you will want to be able to resolve the error and kick off the pipeline from its most recent step (i.e., the Customer build).
This is where Cloud Build’s tight integration with GCP services comes into play. Cloud Build natively can communicate with Pub/Sub, and create push subscriptions for triggers. This means that we can create separate builds for each subject area, and link them together via Pub/Sub.
To view this in action, let’s revisit the cloudbuild_account.yaml configuration file in the example project. The final step in the build publishes a message “SUCCESS” to the “dataform-deployments” topic we created. We also provide a subjectArea attribute that clarifies which subject area just completed.
Now we can take advantage of this system to link our Cloud Build triggers together. Let’s start by creating a trigger for the Customer subject area. Instead of a manual trigger, this time we will create a pub/sub invoked trigger and subscribe it to the “dataform-deployments” topic.
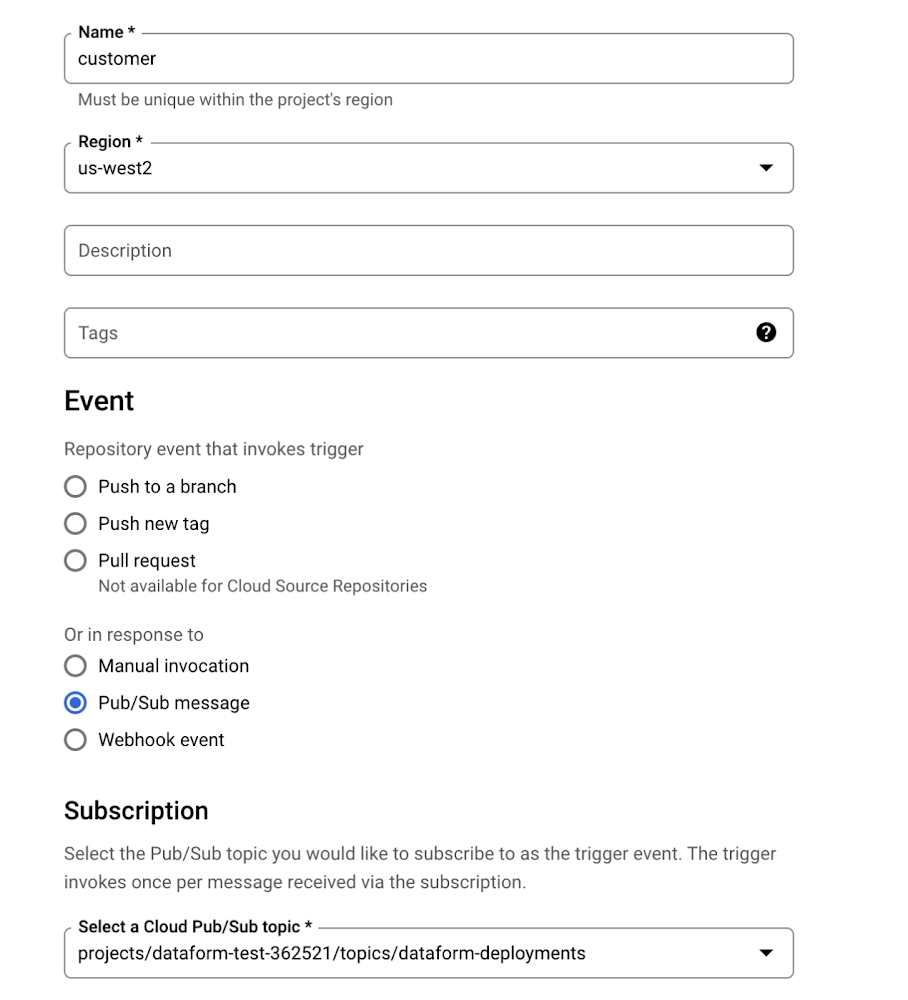
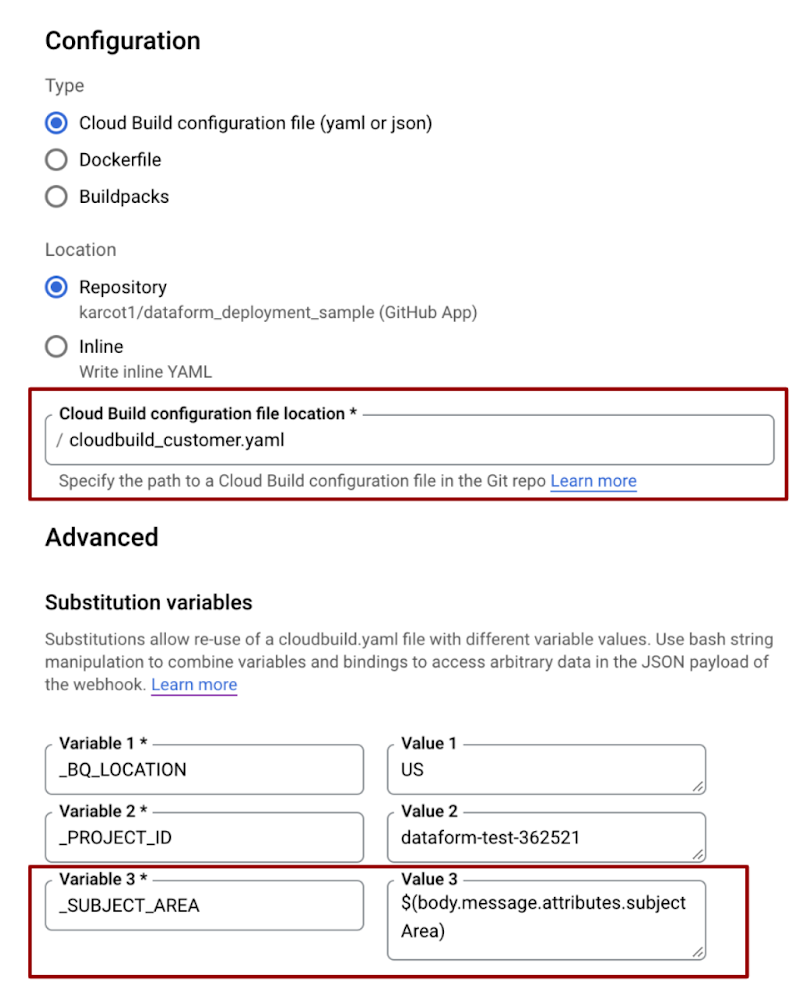
The rest of the configuration steps will be the same as what we set for our Account trigger, with three key differences:
- The configuration file needs to point to the Customer config (“cloudbuild_customer.yaml”)
- We need to add one more substitution variable that stores the metadata from our Pub/Sub message
- We need to add a filter that ensures this trigger only invokes when the “account” subject area completes. We don’t want it to fire every single time a message is published to our topic.
Once the trigger has been set up, let’s go back and kick off the manual trigger for our Account subject area.
What we should now see is for the customer trigger to automatically invoke once the account trigger completes:

Putting it all together: Create a scalable ELT pipeline
Following the same process, we can set up a third build trigger for the “Sales” subject area. This will work the same way as Customer, but it will be waiting for a Pub/Sub message with the attribute “Customer”.
We have now successfully set up a chain of builds that forms a pipeline:
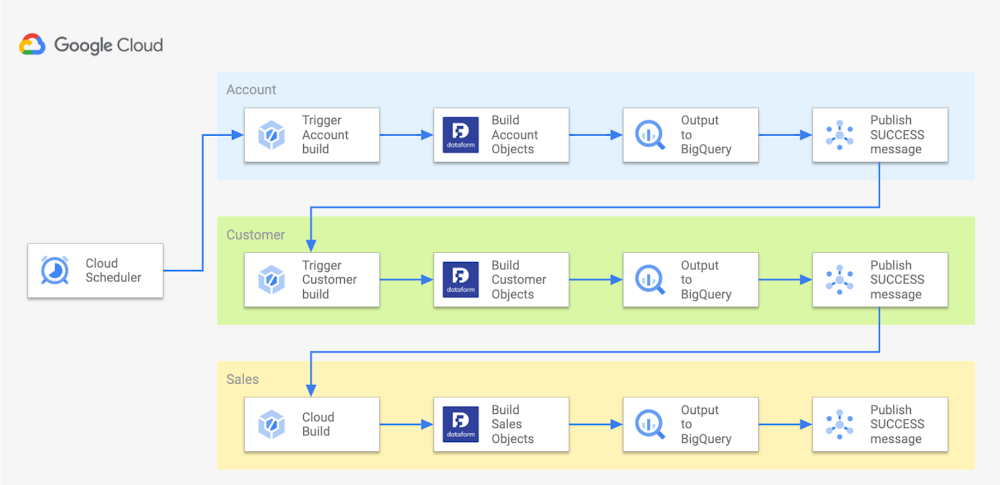
With this set up, scaling the workflow becomes a quick and easy process.
Expanding the SQLX files for a specific subject area
SQLX can now be modified as often as needed by developers in the source repo. Additional files can be created with no impact to the deployment or orchestration process. The only caveat is that new files must be assigned the appropriate tag in their config block.
This way, no matter how much the source code is modified, all of the changes are tracked in GitHub and picked up by Cloud Build automatically.
Creating new subject areas
Creating new subject areas also becomes a straightforward process. A new tag just needs to be assigned to the subject area in question, and from that point the Dataform code can be written and tested locally before merging with the master branch. To incorporate the changes into Cloud Build, a new configuration file and trigger will need to be created. This becomes a simple process however, since most of the configuration is repeatable from previous builds.
Deployment strategies for different environments
Scale across environments
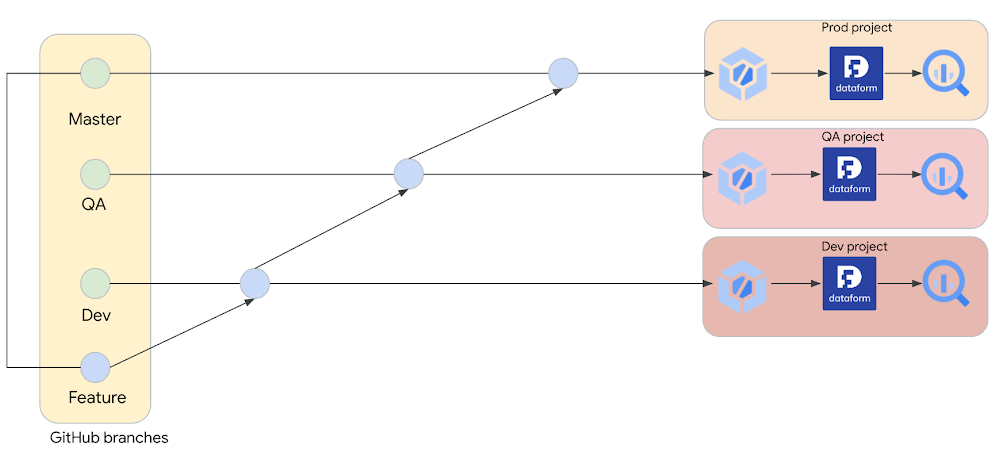
All of the work done thus far is for a single GCP project. What happens when you want to scale this process out across a dev, QA, and production environment? The same process is easily applicable in this scenario — it just requires the following steps:
- Set up a GCP project for each environment
- Create separate branches in your repository for each environment
- Ensure the dataform.json file points to the correct project in each branch
- Set up identical builds in each environment, but configure them to pull from the correct branch in your source repository
- Link the specific branch in each project to Dataform in GCP, following the documentation
Once this is set up, developers can build, test, and deploy changes up through production with very little upkeep or maintenance. All that is required is proper tagging protocols in the Dataform code, and a PR/merge process to move data from one environment to another:
VPC-SC considerations
It is important to note that the proposed setup may not work out-of-the-box in GCP environments leveraging VPC Service Controls for Pub/Sub and/or Cloud Build. Please keep in mind the following considerations.
When running Cloud Build inside of a VPC security perimeter, builds must be run inside of a private pool. Additionally, Pub/Sub push subscriptions inside a security perimeter are only supported for the Cloud Run default run.app URLs. As a result, when attempting to create a push subscription for the Cloud Build trigger, a VPC error will likely pop up.
This can be worked around by either moving relevant projects outside of the perimeter to create the push subscription and then moving them back in, or using webhook-invoked triggers that do not rely on pub/sub.
What next?
The methods show here enable large teams of Data Engineers and Analysts to collaboratively develop code, create deployments, and orchestrate executions all from a single source repository. Using the directions in this blog and the accompanying github sample project, the goal is to enable teams to set up their own scalable architecture for ELT in the cloud.
For more information on adopting Dataform into your workloads, please be sure to review the Google Cloud documentation.
Take Away:
With NTSPL Hosting, you can rely on a comprehensive range of web solutions to meet your business needs. From web hosting and domain services to SSL certificates and cloud hosting, we provide the tools and support to enhance your online presence. Our expert team ensures your website stays secure, accessible, and performs at its best, allowing you to focus on your core business. Trust NTSPL Hosting as your reliable partner, and experience seamless and efficient web solutions that propel your digital success. Choose NTSPL Hosting for a top-notch web experience and take your online endeavors to new heights.


